
We'll start with the dining room and kitchen. Here is a reminder of what they looked like in the original listing:

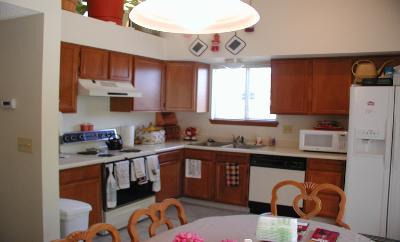
In the kitchen we changed out all light fixtures except for the track light that we would like to replace with a track pendant light for island lighting, we painted all the cabinets white inside and out and added hardware, painted the walls and backsplash, replaced the outlets, switches and covers, replaced all appliances except the fridge, had the linoleum replaced by hardwood floors and purchased and re-vamped an island from Craigslist to add some more counterspace. Eventually we would still like to replace our original laminate countertops with granite tile and travertine tile backsplash and replace the sink and faucet and track light.
 This is a picture of the food set up after we had the neighbors over for a "get to know you" party.
 In the dining room we haven't done much, but we did replace the old window coverings (and added satin ribbon to the ones we purchased from Target), Paul replaced the light fixture, we had the hardwood installed and I re-upholstered our dining chairs with a shower curtain because I just couldn't find any fabric at Joanns that I liked! I still need to find some artwork for the wall next to the dining room table, but I just can't decide on anything that I love yet.
 Here is a picture from the original listing of the family room:
 There has already been a post where I explained most of what we did in this room, so I will spare you from the repetition, but there are a few things that have changed:
 On this wall I did two stencils around the collage of black frames. I still feel like the art display is a little disproportionate to the wall because it looks too small, but that is the way it is staying for now. Maybe in the future I will paint over the stencils and add a row on the bottom and a row on one side, making it a collage of 18, instead of 10.
 After searching for months on Craigslist and not finding anything that met Paul's approval for a desk, we broke down and bought one at Target. I replaced the knob with a pretty blue ceramic knob from Hobby Lobby, but I don't think you can tell in this picture. I like the size of the quilt on the wall, but you'll notice the corkboard to the left of the desk on the floor. I would like to hang that next to the quilt on that wall and pin cards and letters that we get to it, but Paul doesn't like the idea, so instead it is still sitting in the same spot as in the picture where it's been for the last month. :-) I'm hoping if it sits there long enough, maybe he'll decide it would look better on the wall than on the floor! ;-)
 To remind you of what the formal living room looked like in the original listing:

.JPG) We did a ton of "work" (meaning really simple things to make it look better) in this room! I scrubbed down the fireplace to get the bricks looking bright and rich again, we had the dirty 20 yr old blue carpet replaced with hardwood, did all the switches and outlets, recovered the roman shades and added curtains that I made, painted the walls and the rest of it is just decorating and furnishing!
We did a ton of "work" (meaning really simple things to make it look better) in this room! I scrubbed down the fireplace to get the bricks looking bright and rich again, we had the dirty 20 yr old blue carpet replaced with hardwood, did all the switches and outlets, recovered the roman shades and added curtains that I made, painted the walls and the rest of it is just decorating and furnishing! A slightly different angle where you can see what we have along the right wall where the previous owners had their sofa table.
 This is the view from the front entry way.
 I am including this picture from our previous apartment to show how I transformed a piece of artwork. Notice the black frame on the wall in the upper lefthand corner. I bought it at Michael's on clearance for $5 knowing I wanted to turn it into something eventually. In our apartment it remained as it had when I bought it:
 To make it go with our lighter color palette I painted the edge of the frame white, removed the painting from the center and replaced it with a piece of canvas that I stenciled and painted artwork that I found online and then stapled it down to the frame and covered the staples by lining the canvas with a chocolate brown satin ribbon.
 This is a view from the corner window in the formal living room. In the top lefthand corner you can slightly see the doors to our bedroom and bathroom. Eventually those will be replaced with white 6 panel doors. We don't have any artwork on this wall yet, as it is so huge that it leaves a lot of opportunity!
 With a little (not so good, because I didn't want to spend too much time on it) photoshopping, you can see what I have in mind as far as the art for this wall. They sell this "clock" out of Britain and it comes with the 12 different colored frames and the clock mechanism. I think it would be a fun way to display some photos and little pieces of art that can easily be changed out when my mood changes. :-) It's easier than committing to one large permanent piece!
 There you have it! The next two projects are the downstairs guest bedroom and our Master bedroom, but I doubt if either of them will get completely finished before the end of the summer considering Paul and I have to be back to school in less than a month! Yikes! Hope everyone else is enjoying their summer, ours sure is flying by!


.JPG)


